Java Applet Tutorial
A Java Applet is a program written in the Java programming language that can be included in an HTML page, much in the same way an image is included in a page. When we use a Java technology-enabled browser to view a page that contains an Applet, the Applet's code is transferred to our system and executed by the browser's Java Virtual Machine (JVM).
In this Java Applet tutorial, we will cover the basics of Applets and Swing.
- Contents
- 1. Introduction to Applets
- 1.1. Developing the Java Code
- 1.2. Running from a Web browser
- 2. Introduction to Swing
- 2.1. Swing Components
- 2.2. Component Actions
- 2.3. Layout Management
- 3. Appendix
Introduction to Applets
Applet development involves two basic steps, developing the Java code and running it from a Web browser.
Developing the Java code
To create an Applet, we must create a class that extends JApplet from the Swing package. Technically we could extend Applet from the AWT package, but this tutorial will focus on Swing because it provides a more modern and sophisticated set of graphical user interface (GUI) components.
The class definition for the first Applet we will write is shown below:
When we extend an Applet, we need to implement a method called init. All GUI initialization is performed in this method. GUI components are represented by classes and to use these components we must create instances of them and add them to our Applet. For example to create a text area and add it to our Applet, we could write an init method that looks like this:
import javax.swing.JApplet;
import javax.swing.JTextArea;

public class AppletHelloWorld extends JApplet {

    @Override
    public void init() {
        JTextArea area = new JTextArea("Hello World");
        this.add(area);
    }
}
We would compile this program like any other Java application.
$ javac AppletHelloWorld.java

$ ls
AppletHelloWorld.java
AppletHelloWorld.class
At this point, the Applet is ready to be executed, but before that can happen, we need to create an HTML file so it can be displayed from a Web browser.
Running from a Web Browser
Running an Applet from a Web browser is straightforward. We simply need to add the following applet tag somewhere in the body of the HTML.
This tag tells the Web browser to load the Applet from AppletHelloWorld.class and to display it in an area that is 450 pixels wide by 100 pixels high. Because the code attribute does not indicate a path, the Web browser will search for the AppletHelloWorld.class file in the same directory that contains the HTML file.
A minimalistic HTML file for the Applet created above is shown below. To run the Applet, click on the file title or the Java icon.
<html>
<head>
<title>Applet Hello World</title>
</head>
<body>
<applet
code="AppletHelloWorld.class"
width="450"
height="100">
Your browser does not support Applets.
</applet>
</body>
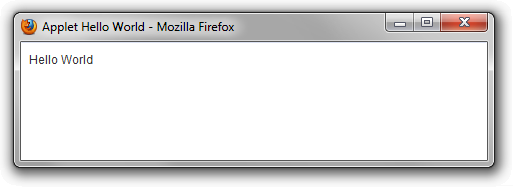
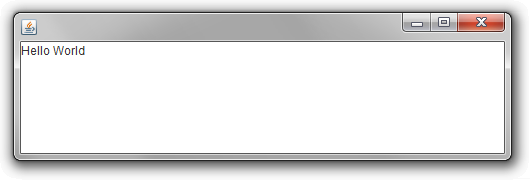
</html> A screenshot of the Applet running from Firefox on Windows 7 is shown here:
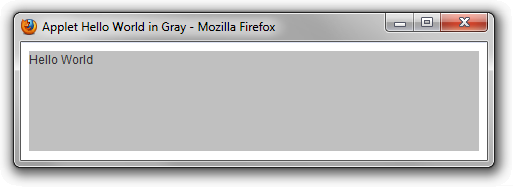
We cannot see the effect of the width and height parameters specified in the applet tag because the background color of the Applet matches the background color of the Web page. To change the background color of the Applet, we can use the setBackground method.
import java.awt.Color;

import javax.swing.JApplet;
import javax.swing.JTextArea;

public class AppletHelloWorldGray extends JApplet {

    @Override
    public void init() {
        JTextArea area = new JTextArea("Hello World");
        this.add(area);

        area.setBackground(Color.LIGHT_GRAY);
    }
}
We must update the HTML code to reflect the new name of the Applet class. To run the Applet, click on the file title or the Java icon.
<html>
    <head>
        <title>Applet Hello World in Gray</title>
    </head>
    <body>
        <applet
            code="AppletHelloWorldGray.class"
            width="450"
            height="100">
            Your browser does not support Applets.
        </applet>
    </body>
</html>
A screenshot of the Applet running from Firefox on Windows 7 is shown here:
Sometimes it is helpful to pass information to our applet to customize its appearance and behavior based on the needs of the Web page. For example, we might want to include our Applet on several pages of our Web site, but not all of those pages have the same color theme. We can tell our Applet to set its color dynamically by specifying parameter attributes in the applet tag.
The Applet class can access these parameters using the getParameter method. If the parameter is not set, then this method will return null. In general, it is a good idea to check for bad values to eliminate the possibility of crashing the Applet. For example,
import java.awt.Color;
import javax.swing.JApplet;
import javax.swing.JTextArea;
public class HelloWorldParameters extends JApplet {
@Override
public void init() {
JTextArea area = new JTextArea("Hello, world!");
this.add(area);
String parameter = this.getParameter("backgroundColor");
if (null != parameter) {
try {
Color color = new Color(Integer.parseInt(parameter, 16));
area.setBackground(color);
} catch (NumberFormatException e) {
// Ignore the bad parameter value.
}
}
}
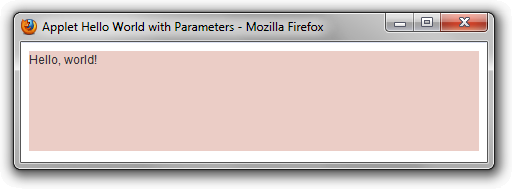
} Here is an example of an HTML file that sets the background color of our new Applet to gray. To run the Applet, click on the file title or the Java icon.
<html>
    <head>
        <title>Applet Hello World with Parameters</title>
    </head>
    <body>
        <applet
            code="HelloWorldParameters.class"
            width="450"
            height="100">

            <param name="backgroundColor" value="ebcdc6" />

            Your browser does not support Applets.
        </applet>
    </body>
</html>
A screenshot of the Applet running from Firefox on Windows 7 is shown here:
Introduction to Swing
Swing is built on top of AWT and is entirely written in Java. It is part of the Java Foundation Classes (JFC), which is an API for providing GUIs for Java programs.
When we derive our Applets from JApplet, we have at our disposal almost all of the functionality that comes with Swing. In fact, it is usually trivial to convert an Applet into a standalone application using the following boilerplate code.
import java.awt.EventQueue;

import javax.swing.JFrame;
import javax.swing.JTextArea;
import javax.swing.WindowConstants;

public class SwingHelloWorld extends JFrame {

    public static void main(String[] args) {
        EventQueue.invokeLater(new Runnable() {
            public void run() {
                SwingHelloWorld self = new SwingHelloWorld();
                self.init();
                self.setSize(500, 150);
                self.setVisible(true);
                self.setDefaultCloseOperation(
                    WindowConstants.DISPOSE_ON_CLOSE);
            }
        });
    }

    public void init() {
        JTextArea area = new JTextArea("Hello, world!");
        this.add(area);
    }
}
This Java GUI program creates a window that is 500 pixels wide by 150 pixels high. The contents of the window are exactly the same as the contents of our first Applet.
Proficiency in Applet development usually indicates proficiency in Swing development, and vice versa. In this section, we will introduce several useful Swing components that may be helpful when developing Applets.
Swing Components
In Swing, classes that represent GUI components have names beginning with the letter J. Some examples are JButton, JLabel, and JSlider. We have already seen JTextArea and JFrame.
In this section, we will introduct the following Swing components:
| Component | Description |
|---|---|
| JButton | A component that generally appears as a button and carries out an action when clicked by the mouse. |
| JLabel | A component that displays static text or images. |
| JTextField | A component that provides a single line of editable text. |
| JTextArea | A component that provides multiple lines of editable text. |
| JScrollPane | A component that wraps another component, allowing it to scroll when its content is larger than its alloted area in the window. |
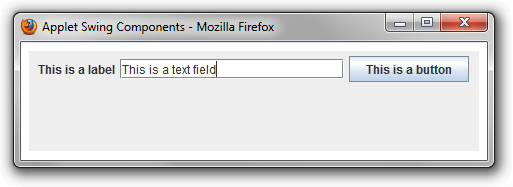
We will start by creating an Applet that displays three of these components, a label, a text field, and a button.
import java.awt.FlowLayout;

import javax.swing.JApplet;
import javax.swing.JButton;
import javax.swing.JLabel;
import javax.swing.JTextField;

public class Components extends JApplet {
    @Override
    public void init() {
        this.add(new JLabel("This is a label"));
        this.add(new JTextField("This is a text field", 20));
        this.add(new JButton("This is a button"));
        this.setLayout(new FlowLayout());
    }
}
We will display this Applet using the following HTML. To run the Applet, click on the file title or the Java icon.
<html>
    <head>
        <title>Applet Swing Components</title>
    </head>
    <body>
        <applet
            code="Components.class"
            width="450"
            height="100">
            Your browser does not support Applets.
        </applet>
    </body>
</html>
Swing automatically positions the components within the window using a FlowLayout layout manager, which will be discussed later.
Without additional code, the Applet does not respond to actions such as modifications to the text or clicks of the button. To process these events, we must implement action listeners.
Component Actions
In GUI programming, events occur asynchronously. When the user performs an action, such as clicking a button, Swing is responsible for forwarding that event to our Applet. We must tell Swing what methods to execute for particular events. Java supports this mechanism through the use of interfaces. In general, we provide interfaces to objects that will be invoked when actions occur.
The most common interface to receive event notifications is the ActionListener, which defines one method, actionPerformed. This is demonstrated in the following bit of code in which our main class, Behavior1, implements this interface in order to respond to events.
import java.awt.FlowLayout;
import java.awt.event.ActionEvent;
import java.awt.event.ActionListener;

import javax.swing.JApplet;
import javax.swing.JButton;
import javax.swing.JLabel;
import javax.swing.JScrollPane;
import javax.swing.JTextArea;
import javax.swing.JTextField;
import javax.swing.ScrollPaneConstants;

public class Behavior1 extends JApplet
    implements ActionListener {

    private JTextArea area;
    private JTextField field;

    // This method executes when the button is clicked
    // or when the user presses the enter key in the
    // text field.
    public void actionPerformed(ActionEvent evt) {

        // Append the text from the text field to the
        // text area, and clear the text in the text
        // field.
        this.area.append("\n" + this.field.getText());
        this.field.setText(null);
    }

    @Override
    public void init() {

        // Add some static text.
        this.add(new JLabel("This is a label"));

        // Add a field and listen for the enter key.
        this.field = new JTextField(
            "Type here and press enter", 20);
        this.field.addActionListener(this);
        this.add(this.field);

        // Add a button and listen for clicks.
        JButton button = new JButton("Append");
        button.addActionListener(this);
        this.add(button);

        // Add a text area that can scroll.
        this.area = new JTextArea(
            "This is a text area", 10, 35);
        JScrollPane pane = new JScrollPane(
            this.area,
            ScrollPaneConstants.VERTICAL_SCROLLBAR_AS_NEEDED,
            ScrollPaneConstants.HORIZONTAL_SCROLLBAR_NEVER);
        this.add(pane);

        // Let Swing manage the layout.
        this.setLayout(new FlowLayout());
    }
}
In this code, we tell Swing to execute the actionPerformed method any time the user clicks the button or presses the enter key while editing the text field.
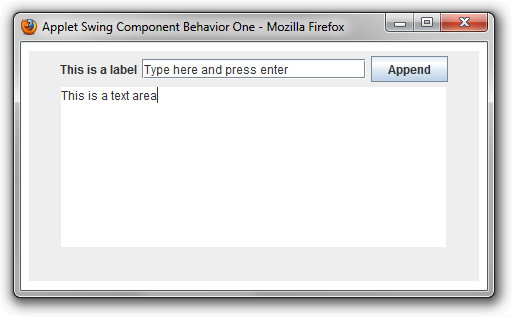
The following HTML demonstrates this Applet in action. To run the Applet, click on the file title or the Java icon.
<html>
    <head>
        <title>Applet Swing Component Behavior One</title>
    </head>
    <body>
        <applet
            code="Behavior1.class"
            width="450"
            height="230">
            Your browser does not support Applets.
        </applet>
    </body>
</html>
The text field and button perform the same action, appending the content of the text field to the text area and then clearing the text field. If enough lines of text are added, a vertical scroll bar appears around the text area (not shown in the following image).
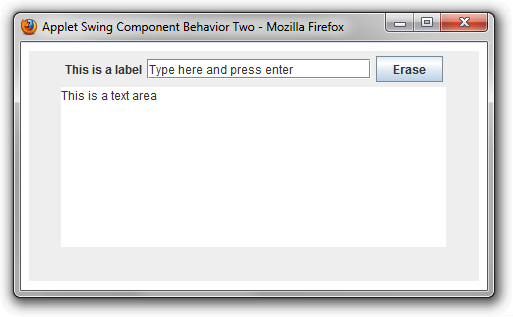
Often, we need different components to perform different actions. A good way to handle this situation is to create anonymous classes. For example, in the following Applet, we use two anonymous classes to perform two different actions: The text field appends its contents to the text area, and the button erases the contents of the text area.
import java.awt.FlowLayout;
import java.awt.event.ActionEvent;
import java.awt.event.ActionListener;

import javax.swing.JApplet;
import javax.swing.JButton;
import javax.swing.JLabel;
import javax.swing.JScrollPane;
import javax.swing.JTextArea;
import javax.swing.JTextField;
import javax.swing.ScrollPaneConstants;

public class Behavior2 extends JApplet {

    @Override
    public void init() {

        // Add some static text.
        this.add(new JLabel("This is a label"));

        // Add a field that allows the user to enter text.
        final JTextField field = new JTextField(
            "Type here and press enter", 20);
        this.add(field);

        // Add a button that allows the user to erase
        // the text field.
        JButton button = new JButton("Erase");
        this.add(button);

        // Add a text area that will accumulate lines
        // of text from the text field.
        final JTextArea area = new JTextArea(
            "This is a text area\n", 10, 35);
        JScrollPane pane = new JScrollPane(
            area,
            ScrollPaneConstants.VERTICAL_SCROLLBAR_AS_NEEDED,
            ScrollPaneConstants.HORIZONTAL_SCROLLBAR_NEVER);
        this.add(pane);

        // Let Swing manage the layout.
        this.setLayout(new FlowLayout());

        // Implement an action listener for the text
        // field; append the text and clear the field.
        field.addActionListener(new ActionListener() {

            public void actionPerformed(ActionEvent evt) {
                area.append(field.getText() + "\n");
                field.setText(null);
            }
        });

        // Implement an action listener for the button.
        // Clear the text area and the text field.
        button.addActionListener(new ActionListener() {

            public void actionPerformed(ActionEvent evt) {
                area.setText(null);
                field.setText(null);
            }
        });
    }
}
Anonymous classes compile to separate class files, and as we saw previously, the code attribute of our applet tag refers to only a single class. Without any modifications to the HTML, the Web browser would know to download the additional classes that are required to run our Applet if those files are located in the same directory, but sometimes it is preferable to provide all the necessary classes in a single archive.
To handle this situation, we may create a Java Archive (JAR) and specify the path to this archive in an archive attribute of the applet tag.
$ ls
Behavior2.class
Behavior2$1.class
Behavior2$2.class

$ jar cvf Behavior2.jar Behavior2*.class
added manifest
adding: Behavior2$1.class(in = 972) (out= 560)(deflated 42%)
adding: Behavior2$2.class(in = 771) (out= 465)(deflated 39%)
adding: Behavior2.class(in = 1147) (out= 672)(deflated 41%)

$ ls
Behavior2.class
Behavior2$1.class
Behavior2$2.class
Behavior2.jar
Once the archive is provided, none of the class files are required on the Web server. The corresponding HTML file demonstrates how to specify this class and JAR file. To run the Applet, click on the file title or the Java icon.
<html>
    <head>
        <title>Applet Swing Component Behavior Two</title>
    </head>
    <body>
        <applet
            code="Behavior2.class"
            archive="Behavior2.jar"
            width="450"
            height="230">
            Your browser does not support Applets.
        </applet>
    </body>
</html>
A screenshot of the Applet running from Firefox on Windows 7 is shown here:
Layout Management
In general, layout managers are objects used in widget toolkits that have the ability to arrange widgets by their relative positions. Java uses layout managers to arrange components in a consistent manner across all windowing platforms.
In this section, we will introduce the following Swing layout managers:
| Layout Manager | Description |
|---|---|
| FlowLayout | Objects that arrange components in a directional flow, much like lines of text in a paragraph. |
| GridLayout | Objects that divide the container into equal-sized rectangles and arrange each component into one of these cells. |
| BorderLayout | Objects that arrange components to the top, bottom, left, right, and center of a container. |
To demonstrate these layout managers, we will create an Applet that allows the user to select a layout manager from a list and see the effects it has on some Swing components. In this implementation, we use a BorderLayout manager to place a drop-down list above a panel that contains serveral Swing components (buttons). When an item in the drop-down list is selected, the layout manager for the panel is changed, and without explicitly setting the bounds of any components, the layout manager rearranges the buttons.
import java.awt.BorderLayout;
import java.awt.Color;
import java.awt.Component;
import java.awt.FlowLayout;
import java.awt.GridLayout;
import java.awt.LayoutManager;
import java.awt.event.ItemEvent;
import java.awt.event.ItemListener;

import javax.swing.JApplet;
import javax.swing.JButton;
import javax.swing.JComboBox;
import javax.swing.JPanel;

public class LayoutManagerExample extends JApplet {

    @Override
    public void init() {

        // Create the bottom panel of components.
        final JPanel panel = new JPanel();
        panel.setBackground(Color.LIGHT_GRAY);

        // Create several components to arrange in the panel.
        final Component[] components = new Component[5];
        for (int i = 0; i < components.length; i++)
            components[i] = panel.add(
                    new JButton("Button " + (i + 1)));

        // Create the combo box to allow changes to the layout.
        final JComboBox comboBox = new JComboBox();

        // When an item is selected, get the layout for that item,
        // through the ComboBoxItem interface (see below), and
        // assign the new layout to the panel.
        comboBox.addItemListener(new ItemListener() {
            public void itemStateChanged(final ItemEvent e) {
                final ComboBoxItem item = (ComboBoxItem) e.getItem();
                panel.setLayout(item.getLayout());
                panel.doLayout();
            }
        });

        // Add the three items, one for each layout manager.
        comboBox.addItem(new BorderLayoutItem(components));
        comboBox.addItem(new FlowLayoutItem());
        comboBox.addItem(new GridLayoutItem());

        // Add and arrange the combo box and panel.
        this.setLayout(new BorderLayout());
        this.add(comboBox, BorderLayout.NORTH);
        this.add(panel, BorderLayout.CENTER);
    }

    // The interface to an item that appears in the combo box.
    private interface ComboBoxItem {
        LayoutManager getLayout();
    }

    // The BorderLayout combo box item.
    private final static class BorderLayoutItem implements ComboBoxItem {
        final BorderLayout layout = new BorderLayout();

        public BorderLayoutItem(final Component[] components) {
            this.layout.addLayoutComponent(components[0], BorderLayout.NORTH);
            this.layout.addLayoutComponent(components[1], BorderLayout.SOUTH);
            this.layout.addLayoutComponent(components[2], BorderLayout.EAST);
            this.layout.addLayoutComponent(components[3], BorderLayout.WEST);
            this.layout.addLayoutComponent(components[4], BorderLayout.CENTER);
        }

        @Override
        public String toString() {
            return "Border Layout Manager";
        }

        public LayoutManager getLayout() {
            return this.layout;
        }
    }

    // The FlowLayout combo box item.
    private final static class FlowLayoutItem implements ComboBoxItem {
        private final FlowLayout layout = new FlowLayout();

        @Override
        public String toString() {
            return "Flow Layout Manager";
        }

        public LayoutManager getLayout() {
            return this.layout;
        }
    }

    // The GridLayout combo box item.
    private final static class GridLayoutItem implements ComboBoxItem {
        private final GridLayout layout = new GridLayout(3, 2);

        @Override
        public String toString() {
            return "Grid Layout Manager";
        }

        public LayoutManager getLayout() {
            return this.layout;
        }
    }
}
We will display this Applet using the following HTML. To run the Applet, click on the file title or the Java icon.
<html>
    <head>
        <title>Applet Swing BorderLayout Example</title>
    </head>
    <body>
        <applet
            code="LayoutManagerExample.class"
            archive="LayoutManagerExample.jar"
            width="450"
            height="150">
            Your browser does not support Applets.
        </applet>
    </body>
</html>
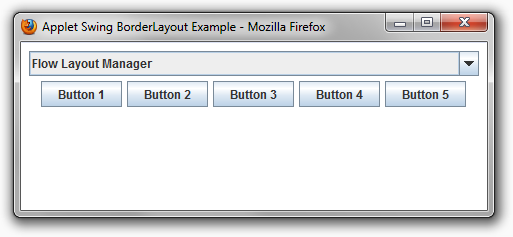
Screenshots of the Applet running from Firefox on Windows 7 are shown below. The following demonstrates the arrangement of the FlowLayout manager.
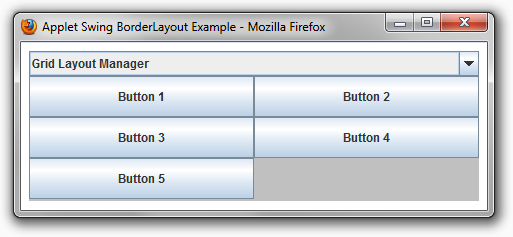
The following demonstrates the arrangement of the GridLayout manager.
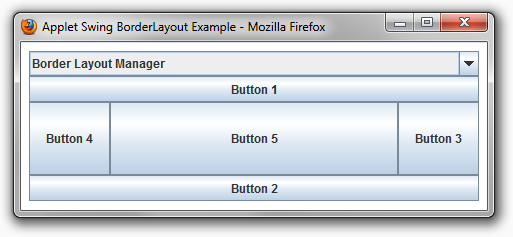
The following demonstrates the arrangement of the BorderLayout manager.
The JRE provides many other layout managers. To explore them further, visit Oracle’s tutorial on Laying Out Components Within a Container.
Keep in mind that layout managers determine the size and position of components within a container. Although components can provide prefered sizes and alignment hints, a container’s layout manager has the final say on the bounds of the components.
Appendix
-
About Java cache.
Sometimes, the Applet does not reflect the changes of our program immediately. If we are running Windows, this is probably due to the fact that the Java Applets are cached in our computer, which allows faster loading. During Applet development, however, we want to follow the steps below to disable Java Applet caching.
-
Open the Windows Control Panel. We should see the Java Coffee Cup icon. Double click the icon to open the Java Control Panel.

In the Java Control Panel, select the General Tab.
-
In the General Tab, click Settings for Temporary Internet Files.

-
In the Temporary Files Settings window, uncheck the box next to the text, Keep temporary files on my computer.

Click OK twice to close the Temporary Files Settings and Java Control Panel windows. Close and restart the Web browser.
-
-
About file permissions
Be sure the permissions of the
.class,.jar, and.htmlfiles allow the Web server to read them. Typically, this is done using thechmodprogram.$ ls -l -rw------- 1 yucheng uh 972 Aug 3 02:45 Behavior2$1.class -rw------- 1 yucheng uh 771 Aug 3 02:45 Behavior2$2.class -rw------- 1 yucheng uh 1147 Aug 3 02:45 Behavior2.class -rw------- 1 yucheng uh 217 Aug 3 02:45 Behavior2.html -rw------- 1 yucheng uh 2416 Aug 3 02:45 Behavior2.jar -rw------- 1 yucheng uh 1968 Aug 3 02:45 Behavior2.java $ chmod 644 Behavior2* $ ls -l -rw-r--r-- 1 yucheng uh 972 Aug 3 02:45 Behavior2$1.class -rw-r--r-- 1 yucheng uh 771 Aug 3 02:45 Behavior2$2.class -rw-r--r-- 1 yucheng uh 1147 Aug 3 02:45 Behavior2.class -rw-r--r-- 1 yucheng uh 217 Aug 3 02:45 Behavior2.html -rw-r--r-- 1 yucheng uh 2416 Aug 3 02:45 Behavior2.jar -rw-r--r-- 1 yucheng uh 1968 Aug 3 02:45 Behavior2.java
-
About packaging in the Java code.
If we use a package, then we need to place the
.classfile into a subdirectory that matches the name of the package. For example, if our package is “subdir” and the./index.htmlfile is in a directory called “dir” then the contents of “dir” should look like this:./index.html ./subdir/Assignment.classAnd the corresponding
.htmlfile would look something like this:: <applet code="subdir.Assignment.class" width="450" height="100"> Your browser does not support Applets. </applet> :But it's much easier to remove the package and keep the
.classfiles next to your.htmlfile../index.html ./Assignment.classIf we do want to use a package, then I recommend we place the class files into a
.jar, keep the.jarfile next to the.htmlfile, and use the archive attribute as I described earlier in this tutorial.: <applet code="subdir.Assignment.class" archive="AssignmentArchive.jar" width="450" height="100"> Your browser does not support Applets. </applet> : -
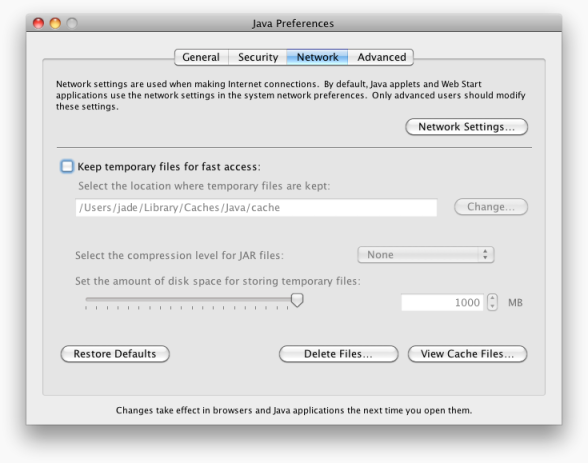
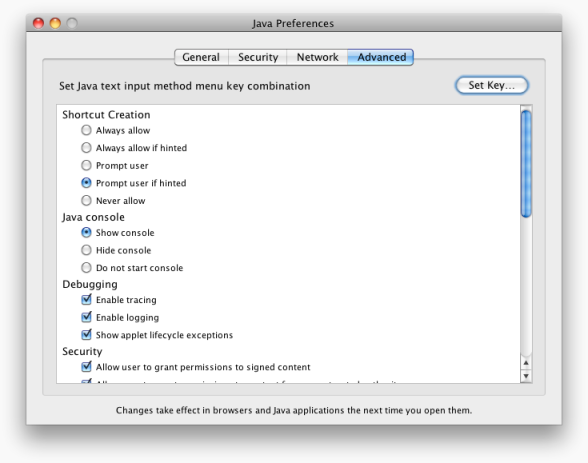
About Mac’s Java Console
For Mac users, to obtain the detailed feedback from the Java Console be sure to enable the Debugging options in the Java Preferences. The preferences are located in the Utilities folder in the Applications folder.

I found it helpful to turn on “Enable tracing”, “Enable logging”, and “Show applet lifecycle exceptions”. Without these options turned on, the Java Console won’t give us much information about what’s going on.
I also found it helpful to disable the Java cache, which is also located in the Java Preferences.